Installation and setup
To work with this tutorial, you’re going to need a few things:
-
Git, of course. Install this by going to the git homepage, git-scm.com.
-
A GitHub account. Create an account by going to github.com.
-
A text editor. Try Visual Studio Code (VS Code) or Sublime Text (both of which are multiplatform).
Configure them to be your default git editors by following the instructions on this page. Note: programs like Microsoft Word or TextEdit are not valid text editors here because they don’t produce plain text files, but rather more elaborate file formats that include text formatting information.
-
A graphical git client or browser. This lets you visualize your git history more easily, and understand the concepts behind git better. For a full list of clients, see here. On Mac, I recommend Git Tower, though it’s not free. The cross-platform SourceTree is free and available on Windows and Mac. On Linux, try gitg or gitk.
Git installation
Install Git on Windows:
- Download the latest Git for Windows installer.
- When you’ve successfully started the installer, you should see the Git Setup wizard screen. Follow the Next and Finish prompts to complete the installation.
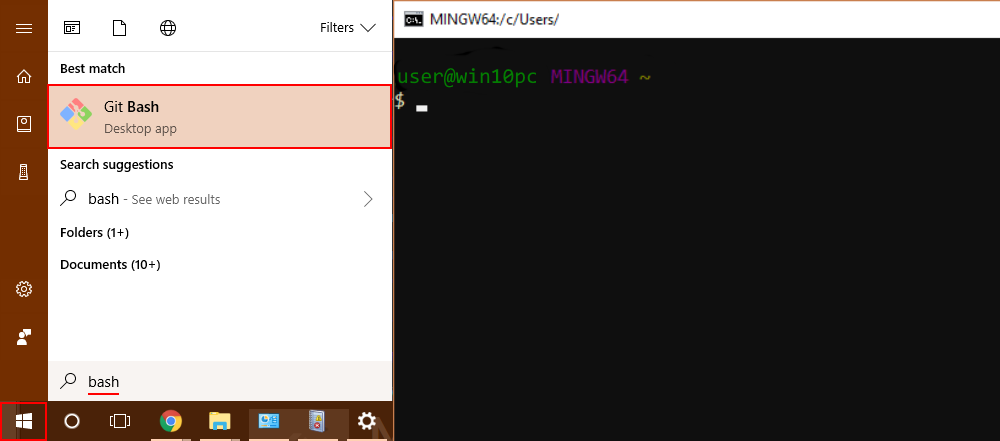
- In your StartUp menu, search for “git bash” and open it.
- Verify installation by typing
git --versionin the git bash window. You will see the installed git version like this: git version 2.33.0.

Install Git on Mac OS X:
- Download the latest Git for Mac installer.
- Follow the prompts to install Git.
- Open your Terminal app.
- Verify installation by typing
git --versionin the terminal. You will see installed git version like this: git version 2.33.0.
Install Git on Linux:
- Open terminal and run:
sudo apt install git-allorsudo yum install git. - Verify installation by typing
git --versionin the terminal. You will see the installed git version like this: git version 2.33.0.
Create an account on Github
-
Open the GitHub link and sign-up using your email address.
-
Remember your email id and your unique GitHub username; we will be using them in git configuration.
Git configuration
You also need to configure git so that it knows your full name and email address. Fire up a console/terminal, and type:
$ git config --global user.name "Your Name"
$ git config --global user.email "Your.Name@email.com"
DO NOT copy the $ for the command.
Note that you need to replace “Your name” with your own information.
Please use the same email address you used for your GitHub account.
For a more user-friendly text editor, we recommend Visual Studio Code and you can associate it with Git by typing the following command in your terminal/git bash window:
$ git config --global core.editor "code --wait"The following command also lets you see a rudimentary graphic of your history without needing a GUI git client:
$ git config --global alias.lsd "log --graph --decorate --pretty=oneline --abbrev-commit --all"Then you can get a nice history (when you have several commits later) within your terminal by typing:
$ git lsdSetup SSH key
Now our git configuration is completed and we are ready to work with git. However, each time we want to push (upload) files to GitHub, we have to associate the local machine with our GitHub account.
Setting up SSH key helps with authentication every time we want to push local commits to the web client GitHub. Please follow the instructions here to create ssh-key and adding it to your GitHub account. We have briefly outlined the commands needed for this step below, and please refer to the link above for more detailed explanations.
- Generating a new SSH key:
$ ssh-keygen -t rsa -b 4096 -C "Your.Name@email.com"Press Enter three times (if you prefer to have another passphrase, type it twice).
- Adding your SSH key to the ssh-agent:
$ eval "$(ssh-agent -s)"
$ ssh-add -K ~/.ssh/id_rsaCopy the SSH key by printing it and copy the output of the command:
$ cat < ~/.ssh/id_rsa.pubGo to your GitHub Settings and click New SSH key. Name your key and paste it in the Key field.
- Test the connection:
$ ssh -T git@github.comVerify that the fingerprint in the message you see matches the following message, then type yes:
Hi username (Your GitHub username)! You've successfully authenticated, but GitHub does not
provide shell access.
Notes
When typing a passphrase, it might seem that the keyboard isn’t working.
However, this is just a security feature (similar to the *s you might see
when typing a password on the web). Just go ahead and type the passphrase,
then repeat it as requested.
For Windows users: Windows does not have an ssh agent running in the background by default. If you see the error:
$ ssh-add ~/.ssh/id_rsa
Could not open a connection to your authentication agent.
you will need to use this command to start the ssh-agent:
$ eval `ssh-agent -s`(Be careful to use the proper backtick symbol, usually just above the “Tab” key on most keyboards; NOT the single quote/apostrophe character.)
Then type:
$ ssh-add ~/.ssh/id_rsa(You might need to change the filename from id_rsa to whatever you used.)
See this StackOverflow answer for more
info.
You need to keep the window on which you launched the ssh-agent open.
Whew! That’s quite a lot of stuff! But I hope by the end of the tutorial you’ll find it all useful and worth getting! (Plus: free stuff!)